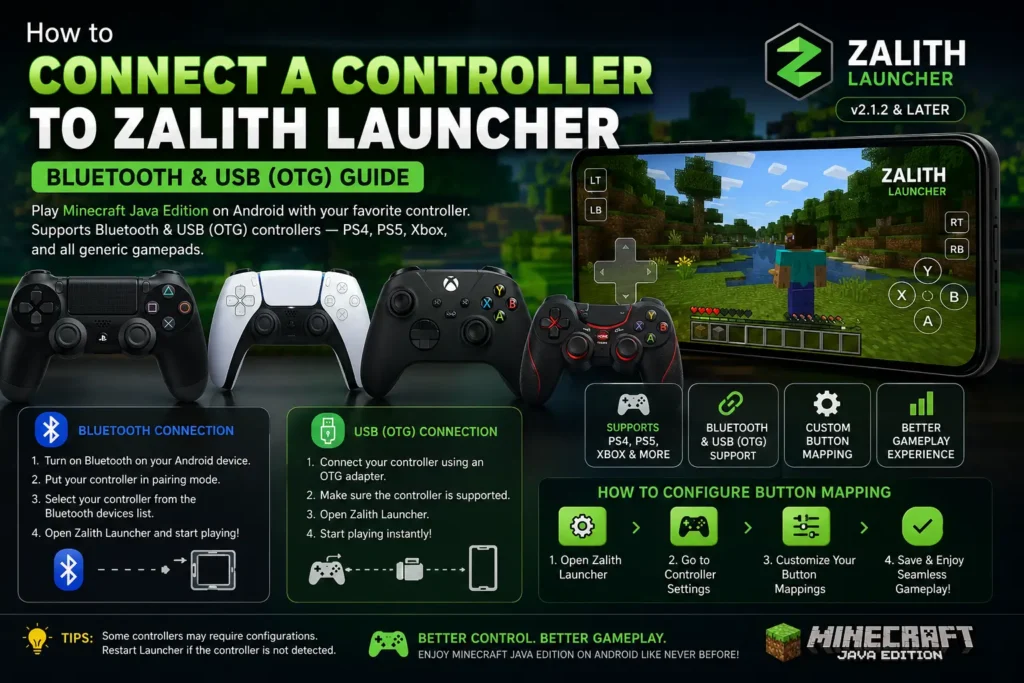
How to Connect a Controller to Zalith Launcher (Bluetooth & USB)
Playing Minecraft Java Edition on Android with a physical controller completely transforms the experience. Whether you prefer a wireless Bluetooth gamepad or a wired USB controller via OTG, Zalith Launcher supports both connection methods out of the box.
This complete guide covers every controller type — PS4, PS5, Xbox, and generic gamepads — explaining exactly how to pair, configure button mappings, and troubleshoot the most common controller issues in Zalith Launcher v2.1.2 and later.
Controller Types Supported by Zalith Launcher
Zalith Launcher supports all major controller types through both Bluetooth wireless and USB wired connections. Before you start the setup process, identify your controller type below to follow the correct pairing method and avoid compatibility issues.
Bluetooth Controllers
PS4 (DualShock 4), PS5 (DualSense), Xbox Series X/S, Xbox One (Bluetooth version), Nintendo Switch Pro Controller, and most generic Bluetooth gamepads. These connect wirelessly directly to your Android device via the system Bluetooth settings. No cables or adapters needed.

USB / OTG Controllers
Wired USB controllers connect to your Android device using a USB OTG (On-The-Go) adapter. This includes most budget wired gamepads, original Xbox One controllers (RF version), and any controller with a USB cable. OTG provides a lag-free, always-stable connection with no battery drain on the controller.

Generic & Mobile Gamepads
Budget Android gamepads from brands like GameSir, Redgear, and Mocute connect via Bluetooth or USB. Most support standard XInput or HID profiles that Android detects automatically. These are the easiest to set up since they are designed specifically for mobile use and pair without additional configuration steps.
Controller Compatibility Reference Table
Use this table to quickly confirm whether your specific controller model works with Zalith Launcher and which connection method it requires before you start the setup process.
| Controller | Connection Method | Bluetooth Pairing | USB OTG | Works in Zalith |
| PS5 DualSense | Bluetooth or USB-C OTG | ✅ Yes | ✅ Yes | ✅ Full Support |
| PS4 DualShock 4 | Bluetooth or Micro-USB OTG | ✅ Yes | ✅ Yes | ✅ Full Support |
| Xbox Series X/S | Bluetooth or USB-C OTG | ✅ Yes | ✅ Yes | ✅ Full Support |
| Xbox One (Bluetooth) | Bluetooth or USB OTG | ✅ Yes | ✅ Yes | ✅ Full Support |
| Xbox One (RF/Original) | USB OTG only | ❌ No Bluetooth | ✅ Yes | ✅ Via OTG |
| Nintendo Switch Pro | Bluetooth | ✅ Yes | ⚠️ Limited | ✅ Full Support |
| GameSir / Generic Android | Bluetooth or USB OTG | ✅ Yes | ✅ Yes | ✅ Full Support |
| Wired USB Gamepad | USB OTG adapter required | ❌ Not Applicable | ✅ Yes | ✅ Plug & Play |
Two Ways to Connect — Bluetooth vs USB OTG
Zalith Launcher works with controllers connected at the Android system level. The launcher detects input automatically once your device recognizes the controller. Choose your method below.
Bluetooth Controllers
- No cables needed — play from a distance
- PS4, PS5, Xbox Series X/S, Switch Pro supported
- Pair once via Android Bluetooth settings
- Controller battery required
- Minor input latency (~8–12ms typical)
USB OTG Controllers
- Requires a USB OTG or USB-C adapter
- Zero latency — most responsive option
- Original Xbox One RF controllers via OTG only
- Plug and play — no pairing needed
- Charges some controllers while playing
Android Gamepads
- GameSir, Redgear, Mocute, Flydigi etc.
- Designed for Android — easiest to pair
- Many clip directly onto your phone
- Available in both Bluetooth and USB versions
- Full button mapping support in Zalith
How to Connect a Bluetooth Controller to Zalith Launcher
Bluetooth controller pairing happens at the Android system level — not inside Zalith Launcher. Once your Android device recognizes the controller, the launcher will automatically detect it when you launch a game. Follow the steps below for your specific controller model.
Before You Start — Checklist
Step-by-Step: Bluetooth Controller Pairing
- Open your Android device Settings app and navigate to Connected Devices or Bluetooth.
- Turn Bluetooth On if it is not already enabled. The device will begin scanning for nearby Bluetooth devices.
- Put your controller into pairing mode using the method for your specific model (see the controller-specific pairing guide below for exact button combinations).
- Your controller will appear in the list of Available Devices on your Android screen. Tap the controller name to begin pairing.
- Wait for the confirmation message — “Connected” or “Paired” — to appear under the controller name.
- Open Zalith Launcher and select your Minecraft version. Tap Play to launch the game.
- Once Minecraft loads, press any button on your controller. If the launcher detects it, the controller state will switch to Gamepad Operation mode automatically.
- Open the Control Layout settings inside Zalith Launcher to assign or confirm your button bindings for gameplay.
Controller-Specific Pairing Mode Instructions
Every controller model has a slightly different button combination to enter Bluetooth pairing mode. Use the guide for your exact controller below.
PS4 DualShock 4
- Hold Share + PlayStation button together for 3 seconds
- The light bar flashes rapidly — controller is in pairing mode
- Select “Wireless Controller” on your Android device
- Light bar turns solid blue when connected
PS5 DualSense
- Hold Create button + PlayStation button for 3 seconds
- The light bar flashes blue in a quick double-flash pattern
- Select “DualSense Wireless Controller” on your Android device
- Light turns solid when paired successfully
Xbox Series X/S Controller
- Hold the Pair button (top of controller) for 3 seconds
- The Xbox logo button will flash rapidly
- Select “Xbox Wireless Controller” on your Android device
- Xbox logo turns solid when connected
Xbox One (Bluetooth version)
- Hold the Pair button near the USB port for 3 seconds
- The Xbox logo flashes to signal pairing mode
- Select “Xbox Wireless Controller” on your Android device
- Note: Original Xbox One controllers use RF — connect via USB OTG instead
Switch Pro Controller
- Hold the small Sync button on the top edge for 3 seconds
- All four LED indicators will flash in sequence
- Select “Pro Controller” on your Android device
- A single LED will remain lit when paired
GameSir / Generic Gamepads
- Hold the Home or Mode button until LED flashes (varies by model)
- Check your gamepad manual for the exact pairing button
- Select the gamepad name on your Android device
- Most mobile gamepads are designed for Android and pair quickly
How to Connect a USB Controller via OTG Adapter
USB OTG (On-The-Go) lets your Android device act as a USB host — meaning it can power and read data from external USB devices including wired game controllers. This method delivers the most stable, lag-free controller experience in Zalith Launcher. You will need a USB OTG adapter that matches your phone’s charging port (USB-C or Micro-USB).
Setting Up a USB OTG Controller
USB OTG — What to Expect
Advantages of USB OTG
Limitations of USB OTG
How to Configure Controller Button Mapping in Zalith Launcher
After your controller is connected at the Android system level, you need to set up the control layout inside Zalith Launcher so each button triggers the correct in-game action. Zalith Launcher has a full Control Layout editor designed specifically for this purpose.
Open the Control List Manager
In Zalith Launcher, tap the Settings icon from the main screen and find “Control List” in the left navigation bar. Tap it to enter the control layout management page.
Create or Select a Control Layout
Tap the Create button at the top of the left panel to make a new layout. Give it a name like “PS4 Controller” or “Xbox Layout”. Existing layouts are listed in the left panel — tap one to select it.
Enter the Control Layout Editor
With your layout selected, tap Edit to open the full control layout editor. This editor allows you to add virtual buttons, assign physical gamepad buttons to in-game keyboard commands, and arrange layers for different game states.
Assign Gamepad Buttons to In-Game Actions
Tap any control element on the screen to open its properties. In the Key Binding field, press the corresponding button on your connected controller. The launcher will detect and record the input automatically. Assign movement, jump, attack, inventory, and other actions one at a time.
Set Up Gamepad Layer States
Zalith Launcher supports three input states: Touch, Physical Mouse, and Gamepad. When your controller is in use, the launcher switches to Gamepad Operation state automatically and shows/hides control layers accordingly. Make sure your control layout has a Gamepad layer configured.
Save and Apply the Layout
Tap Save to store your control layout. Return to the launcher home screen, select your Minecraft version, and tap Play. Your controller layout will load automatically when the game starts.
⚠️ Important: Avoid assigning two different in-game actions to the same controller button. Duplicate bindings will cause unpredictable behavior in-game. Each button should have only one function assigned.
Common Controller Problems and Fixes
If your controller is not working as expected in Zalith Launcher, check the most common issues and solutions below before giving up.
Controller Not Detected by Android
Make sure the controller is fully in pairing mode — check the LED pattern matches your model’s pairing signal. Remove any existing pairing from the controller by holding the sync button for 10 seconds to reset it. Then pair fresh from Android Bluetooth settings. For USB OTG, try a different OTG adapter or USB cable as the adapter may be faulty.
Controller Paired But Not Working In-Game
Your Android device has recognized the controller but Zalith Launcher has not assigned the buttons correctly. Open Control List in launcher settings, select your layout, and manually assign each button. Make sure the Gamepad layer is enabled in your control layout and that the layout is selected as the active layout for your Minecraft version.
Controller Disconnects During Gameplay
Bluetooth interference is the most likely cause. Move closer to your phone, remove other Bluetooth devices from the area, and ensure your controller battery is above 20%. If using USB OTG, check that the OTG adapter is securely seated in your phone’s port. Some phones have aggressive battery-saving modes that disconnect Bluetooth — disable battery optimization for Zalith Launcher in Android settings.
Wrong Buttons Firing / Incorrect Mapping
This means your button bindings in the Control Layout editor are incorrectly assigned. Open the layout editor, check each binding carefully, and remove any duplicate assignments. The launcher does not auto-map controller buttons — every button must be manually assigned to the correct keyboard or mouse action.
Analog Sticks Not Moving the Camera or Character
Analog stick axes (left stick for movement, right stick for camera) must be assigned separately from face buttons. In the Control Layout editor, look for axis-type bindings and assign the left stick to WASD movement and the right stick to mouse-look. Generic gamepads may need axis inversion enabled if movement is in the wrong direction.
FAQs
Common controller setup questions for Zalith Launcher answered simply.
Conclusion
Connecting a controller to Zalith Launcher is straightforward once you understand the two-step process — pair the controller at the Android system level first, then configure your button bindings inside the launcher’s Control Layout editor. Whether you prefer the wire-free convenience of Bluetooth with a PS4 or Xbox Series X controller, or the zero-lag reliability of USB OTG, both methods deliver a genuine console-style Minecraft experience on your Android device.
For the smoothest experience, use a Bluetooth controller like the PS5 DualSense or Xbox Series X controller paired to Android, with a dedicated gamepad control layout saved in Zalith Launcher. If you experience any disconnections or input lag, switching to a USB OTG wired connection will solve the problem instantly. Zalith Launcher controller setup takes just a few minutes and once it is configured you will never want to go back to touch-only controls for Minecraft Java Edition on Android.
Also Read: Zalith Launcher Account Setup — Microsoft Login, Mojang, and Offline Mode